
Creating tutorials can be incredibly rewarding but it can also be time-consuming, especially if you’re recording voiceovers for every single video. Retakes, background noise, mic problems, or simply not liking how you sound can add hours to your workflow. CapCut Text to Speech AI lets you turn scripts into clean, natural-sounding audio in seconds. No studio, no microphone, no post-production headache just fast, polished voiceovers ready to drop into your tutorials. Whether you create educational content, how-to videos, software guides, crafting tutorials, or product walk-throughs, this tool helps you cut production time and focus on storytelling instead of technical hassles.
Table of Contents
Why Use CapCut Text to Speech AI for Tutorials?
CapCut’s TTS feature is built for speed and quality. Unlike traditional voiceover recording, you don’t need to worry about accents, re-recording lines, or eliminating noise. Just type or paste your script, choose a voice, and let the AI narrate it smoothly. Here’s why tutorial creators love it:
1. Consistent Voiceovers Every Time
Your narration style remains the same across all videos. Even if you work on multiple tutorials in a day, the voice and tone don’t change.
2. Saves Hours of Recording Time
No need to sit in front of a microphone or redo lines. If you want a small phrasing tweak, simply edit the text and regenerate the audio.
3. Perfect for Camera-Shy or Busy Creators
If you’re not comfortable speaking on camera or you work in a noisy environment, Text to Speech gives you clean results instantly.
4. Variety of AI Voices
CapCut includes many voice styles friendly, educational, exciting, formal, robotic, and more so you can match your tutorial style.
5. Built-In Audio Enhancements
You can add noise reduction, fade-in/out effects, and adjust volume to polish your sound.
With these features, you can go from script to finished tutorial in record time.
How to Produce Faster Tutorials with CapCut Text to Speech AI
Step 1: Upload Your Video
Visit CapCut and upload the video to a blank canvas from your device storage. Start by opening CapCut Desktop on your computer. Once the software loads, select Create project to launch a fresh editing canvas. From here, click Import to bring in your tutorial footage. You can upload screen recordings, camera shots, demo clips, or even raw video segments that you plan to assemble later.
Once the video appears in your media library, drag it onto the timeline. This gives you full control to trim unwanted sections, arrange clips in the correct order, and prepare your visuals before adding narration. Setting up your timeline first helps you align your script with the visuals, ensuring a smooth, clear tutorial. If you don’t have footage yet, CapCut also supports adding placeholder clips, transitions, text overlays, and images so you can create narration-first tutorials as well. This flexibility makes Step 1 simple and beginner-friendly.
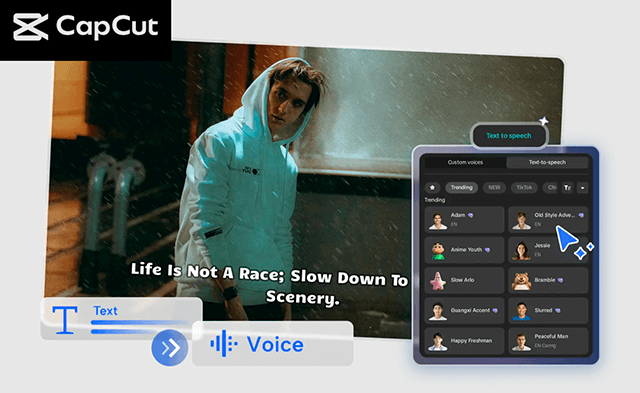
Step 2: Convert Text to Speech
Apply the Text > Default text to enter your script, then click Text to speech to generate voices. Feel free to apply voice effects, noise reduction, volume adjustment, fade in and fade out, to enrich your audio content. After your video is in place, go to the Text panel on the left and select Default text. A text box will appear on your canvas and timeline. Delete the placeholder text, then paste or type your tutorial script directly into it. Once your script is ready, click the Text to Speech button. This opens CapCut’s library of AI voices. You can preview different tones educational, warm, energetic, conversational, narrator-style, and more. Choose the one that best fits your audience and tutorial theme.
After selecting a voice, press Generate and CapCut will instantly convert your script into a clean audio narration. The generated voice clip appears on your timeline, synced with your video for easy adjustments. This step eliminates mic issues, saves time, and ensures your narration sounds professional every single time. Try CapCut AI features such as AI Avatar, AI Video Maker to create an amazing video clip in a minute.
Step 3: Export & Share
Set parameters including file name, resolution, format, and quality. Download the video or share it on your social media channels like TikTok. Once your visuals and AI voiceover are aligned, it’s time to export your finished tutorial. Reels, or Facebook, CapCut also offers presets to match each platform’s recommended settings. After you have everything configured, hit Export. CapCut will process the file in seconds. Then you can download and save it to your device or use CapCut’s built-in Share options to publish the tutorial directly to your social channels. With everything ready, your tutorial is now polished, narrated, and prepared to reach your audience.
Conclusion
Producing tutorials shouldn’t feel overwhelming or time-intensive. CapCut Text to Speech AI takes away the hardest part recording clean, clear voiceovers so you can create content faster without sacrificing quality. Whether you’re new to tutorial creation or an experienced educator looking to speed up your process, this feature helps you work smarter, not harder.